Running Local Notebooks on Databricks Using VS Code
Execute Jupyter notebooks locally in VS Code while leveraging Databricks compute infrastructure. Your code runs on Databricks’ serverless compute, but you edit and manage files locally—giving you the best of both worlds: local development experience with cloud compute power.
Execute Jupyter notebooks locally in VS Code while leveraging Databricks compute infrastructure. Your code runs on Databricks’ serverless compute, but you edit and manage files locally—giving you the best of both worlds: local development experience with cloud compute power.
-
Databricks account (Free Edition works fine https://www.databricks.com/learn/free-edition)
-
VS Code installed
-
Python environment manager (uv, pip, or conda)
-
Open VS Code Extensions marketplace (Ctrl+Shift+X / Cmd+Shift+X)
-
Search for “Databricks”
-
Install the official Databricks extension by Databricks
-
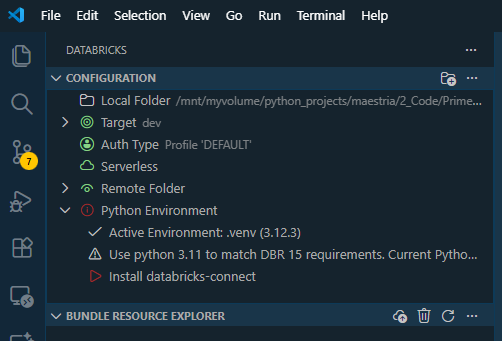
After installation, authenticate with your Databricks workspace
⚠️ Important: When installing the Databricks extension, let it create and manage its own virtual environment. Manually creating your own environment can trigger compatibility warnings.
Once the extension is installed:
- Activate Serverless Compute (or select your cluster)
In Databricks Free Edition, “Serverless” is the default option
-
You should see green icons indicating active connection
-
Enable Remote Folder Sync (optional but recommended)
This opens a “sync” terminal session
-
Keeps files synchronized between local and Databricks workspace
-
Keep this terminal open for continuous sync
When you click on authenticate, you’ll be required to create a profile and input the values of the host and token, this saves your configuration to ~/.databrickscfg:
[DEFAULT]host = https://dbc-xxxxx.cloud.databricks.comtoken = dapi...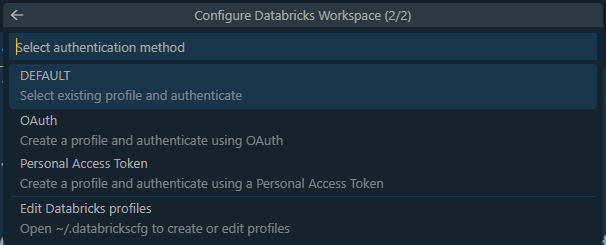
Activate the virtual environment created by Databricks extension, then install:
# Activate the Databricks venv (path shown in VS Code)source /path/to/databricks-venv/bin/activate
# Install required packagespip install databricks-connect==17.2.0Note: Use databricks-connect version that matches your Databricks runtime. For most cases, version 17.2.0 works well.
Run the configuration command:
databricks configure --tokenYou’ll be prompted for:
-
Hostname: Your Databricks workspace URL (e.g., https://dbc-xxxxx.cloud.databricks.com/)
-
Token: Personal access token (PAT) from Databricks
-
Go to your Databricks workspace
-
Click your profile → Settings → Developer → Personal access tokens
-
Click Generate new token
-
Copy and save the token securely
-
Paste it when prompted by the CLI
In your notebook, create a Spark session using Databricks Connect:
from databricks.connect import DatabricksSession
# Read configuration from ~/.databrickscfgspark = (DatabricksSession.builder         .profile("DEFAULT")      # Uses config from ~/.databrickscfg         .serverless(True)         # Use serverless compute         .getOrCreate())
print(f"✓ Connected! Spark version: {spark.version}")If you prefer to specify credentials explicitly:
from databricks.connect import DatabricksSession
spark = (DatabricksSession.builder         .host("https://dbc-xxxxx.cloud.databricks.com")         .token("dapi...")         .serverless(True)         .getOrCreate())
⚠️ Security Note: Don’t hardcode tokens in notebooks you plan to share or commit to git. Use .profile("DEFAULT") instead.
Test your connection:
# Check Spark versionimport pysparkprint(f"PySpark Version: {pyspark.__version__}")
# Test reading a table (if you have one)df = spark.table("catalog.schema.table_name")df.show(5)-
Local: VS Code editor, notebook files live on your machine
-
Remote: Code execution happens on Databricks serverless compute
-
Sync: The extension automatically syncs your notebook to Databricks when you execute cells
-
Results: Output appears directly in VS Code
┌─────────────────┐│ VS Code │ ← You edit here│ (Local) │└────────┬────────┘ │ Databricks Connect ↓┌─────────────────┐│ Databricks │ ← Code runs here│ Serverless │└─────────────────┘-
Open your .ipynb file in VS Code
-
Select the Databricks Python kernel
-
Click “Run All” or execute individual cells
-
Code runs on Databricks serverless compute
-
Results display in VS Code
# Unity Catalog tablesdf = spark.table("catalog.schema.table_name")
# Hive metastore tablesdf = spark.table("workspace.default.table_name")
# Display resultsdf.show(10)The .bundle folder is created automatically by Databricks Asset Bundle:
-
What it is: Synchronized version of your project in Databricks
-
Where it syncs: /Workspace/Users/your-email/.bundle/project-name/dev/
-
Auto-sync: Updates automatically when you execute cells
-
Purpose: Version control and deployment management
You can safely ignore it. To keep it out of Git:
echo ".bundle/" >> .gitignoreThe .bundle folder is the remote copy—your local notebook files are the source of truth.
Problem: metadata-service: Connection refused
Solution: Clear environment variables that force metadata service authentication:
import os
# Remove problematic environment variablesfor var in ['DATABRICKS_AUTH_TYPE', 'DATABRICKS_METADATA_SERVICE_URL', 'DATABRICKS_SERVERLESS_COMPUTE_ID']:    os.environ.pop(var, None)
# Then create sessionspark = DatabricksSession.builder.profile("DEFAULT").serverless(True).getOrCreate()Problem: ValueError: default auth: ...
Solution:
-
Verify token and hostname in ~/.databrickscfg
-
Check token hasn’t expired
-
Regenerate token if needed
-
Run databricks configure —token again
Problem: ModuleNotFoundError: databricks.connect
Solution:
pip install databricks-connect==17.2.0Make sure version matches your Databricks runtime.
Problem: Cell execution hangs indefinitely
Solution:
-
Check that serverless compute is enabled in your workspace
-
Verify you have available compute quota
-
Check Databricks workspace for job status
-
Try restarting the kernel
Problem: NameError: name 'spark' is not defined
Solution: Make sure you run the initialization cell first:
from databricks.connect import DatabricksSession
spark = (DatabricksSession.builder .profile("DEFAULT") .serverless(True) .getOrCreate())-
✅ Use .profile(“DEFAULT”) to read from ~/.databrickscfg
-
✅ Never commit tokens to git
-
✅ Add ~/.databrickscfg to .gitignore if sharing configs
-
✅ Rotate tokens periodically
-
❌ Don’t hardcode tokens in notebooks
-
Local Development: Edit notebooks in VS Code
-
Test Locally: Run cells and verify output
-
Version Control: Commit to git (excluding .bundle/)
-
Production: Deploy using Databricks Asset Bundles or workspace sync
-
Use spark.sql() for complex queries instead of DataFrame operations
-
Cache intermediate results: df.cache()
-
Use display() for better visualization in Databricks
-
Monitor compute usage in Databricks workspace
your-project/├── .bundle/ # Auto-generated, ignore in git├── .gitignore # Add .bundle/ here├── databricks.yml # Databricks Asset Bundle config├── notebooks/│ ├── analysis.ipynb│ └── etl.ipynb├── src/│ └── utils.py└── README.md-
📁 Your local notebook file is the source of truth
-
🔄 Databricks syncs automatically when you execute cells
-
📊 Use display() for enhanced Databricks visualizations
-
🌐 Check Databricks workspace to see synced notebooks
-
💰 Free Edition includes generous compute allocation
-
🗂️ Don’t delete .bundle/—it’s managed by Databricks
-
🔍 View compute logs in Databricks workspace for debugging
-
⌨️ Use VS Code keyboard shortcuts for faster development
# Configure Databricks CLIdatabricks configure --token
# List workspacesdatabricks workspace list /
# Check current profiledatabricks auth env --profile DEFAULT
# Install packagespip install databricks-connect==17.2.0# Cell 1: Initialize Sparkfrom databricks.connect import DatabricksSession
spark = (DatabricksSession.builder .profile("DEFAULT") .serverless(True) .getOrCreate())
print(f"✓ Spark {spark.version} ready")
# Cell 2: Your analysisdf = spark.table("catalog.schema.table")df.show()-
Databricks Connect Documentation
-
VS Code Extension Guide
-
Databricks Asset Bundles
-
Databricks CLI Reference
With this setup, you get:
-
🚀 Local development with VS Code’s powerful editor
-
☁️ Cloud compute without local resource constraints
-
🔄 Automatic sync between local and Databricks
-
📊 Full Databricks features (Unity Catalog, Delta Lake, etc.)
-
💻 Familiar workflow like regular Jupyter notebooks
I found this video tutorial very helpful and very well explained about the general process of installing the Databricks extension in VS Code, although some of the details differ from my experience above, but even with that, it gives a good idea about how to install and use the extension.
That’s it. Happy coding with Databricks from VS Code! 🚀