How to Set Up a Powerful, Free Forever Server on Oracle Cloud (Caddy Edition)
Earlier in 2025, I signed up for Oracle’s “Free Forever” cloud offer. It was, and still is, one of the most generous free tiers available, especially for developers and hobbyists. I wrote a blog post to document my setup, and today I’m updating it with a more modern,...
Earlier in 2025, I signed up for Oracle’s “Free Forever” cloud offer. It was, and still is, one of the most generous free tiers available, especially for developers and hobbyists. I wrote a blog post to document my setup, and today I’m updating it with a more modern, simpler stack and more tips for anyone starting out.
The goal remains the same: to combine all the “Always Free” resources into a single, powerful virtual private server (VPS) that you can use for your projects without ever paying a dime. This guide is my personal reference for setting it up again, and I hope it helps you too.
Oracle Cloud’s Always Free tier offers an incredibly generous free VPS that’s perfect for hosting websites, APIs, and side projects. This comprehensive guide combines the simplicity of Caddy with robust security practices to create a production-ready server.
First, let’s be clear about how generous this offer is. When you consolidate the main resources for a single server, this is what you get, for free, forever:
| Component / Purpose | “Always Free” Allocation | How It Benefits Your Server |
|---|---|---|
| Server CPU & RAM | 4 ARM OCPUs & 24 GB RAM | This is the core of your machine. It’s powerful enough to run multiple apps, a game server, or a complex web service. |
| Primary Storage | 200 GB Block Storage (Total) | Your server’s “hard drive.” This is the combined total of boot volumes and block volumes. Typically: 50 GB boot + 150 GB block volume. |
| Database | 2 Autonomous Databases | You get two dedicated, fully-managed Oracle databases. Offloading your database work to these frees up your server’s CPU and RAM. |
| Networking | 1 Load Balancer & 10 TB/month Data Transfer | A stable public entry point for your services and a massive amount of free bandwidth. |
While NGINX is powerful and widely used, Caddy offers several advantages:
-
Automatic HTTPS: Caddy automatically obtains and renews SSL/TLS certificates from Let’s Encrypt
-
Simpler Configuration: Caddy’s configuration syntax is more intuitive and easier to read
-
Modern Defaults: Caddy comes with secure defaults out of the box
-
No Plugin Required: Unlike NGINX, you don’t need additional plugins for automatic SSL
Go to the Oracle Cloud Free Tier page and sign up. You will need a credit card for verification, but you won’t be charged as long as you only use “Always Free” eligible resources.
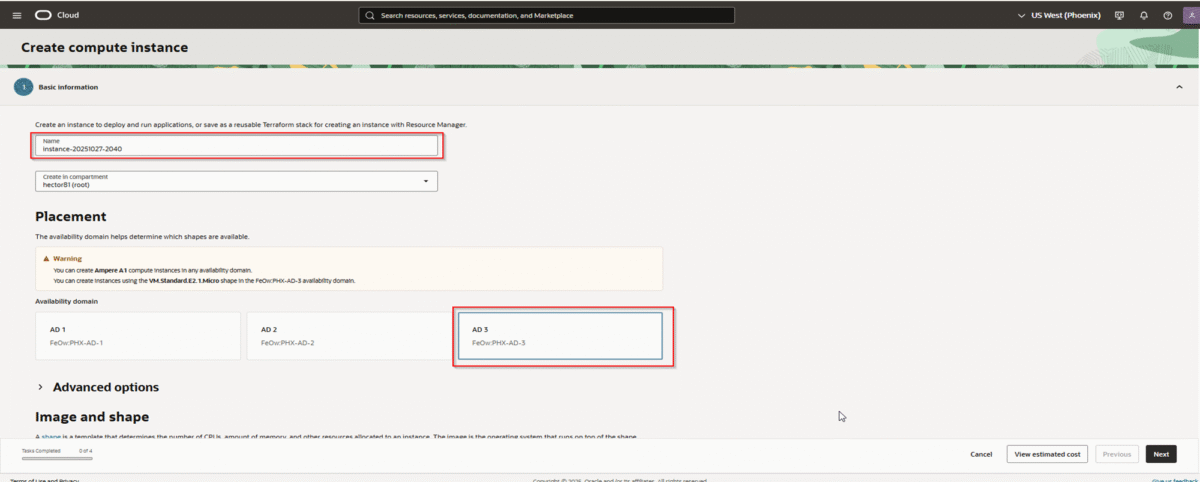
Choose your region carefully. All your “Always Free” resources must be in this single region. In my case, I selected Phoenix, as it is one of the big regions closer to Mexico. I had the bad experience in another Oracle VM setup of selecting Querétaro, México, but since it is new and doesn’t have as much resources as other regions, I couldn’t install any server under the free eligible offer.
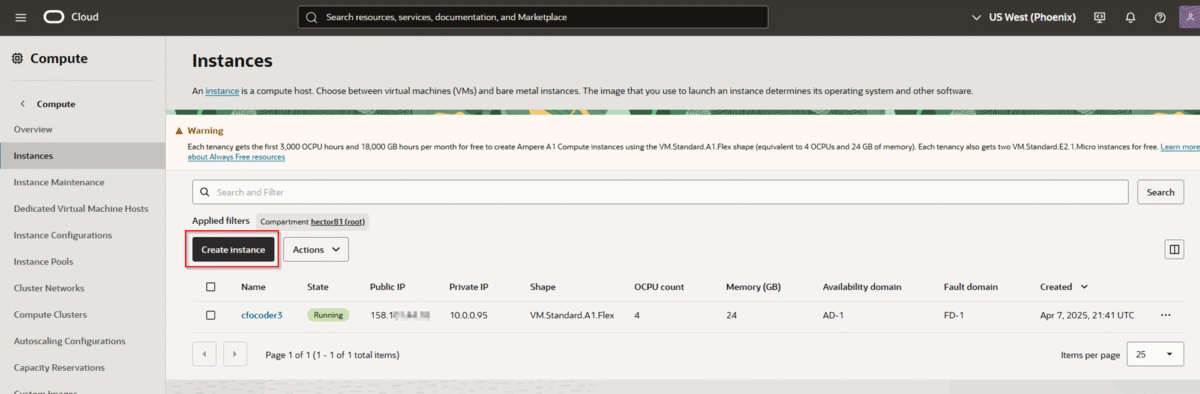
From the OCI console dashboard, click “Create a VM instance”
Shape Configuration:
-
Name: Give your server a descriptive name, like vps-main or my-cloud-server
-
Placement: Leave as is
-
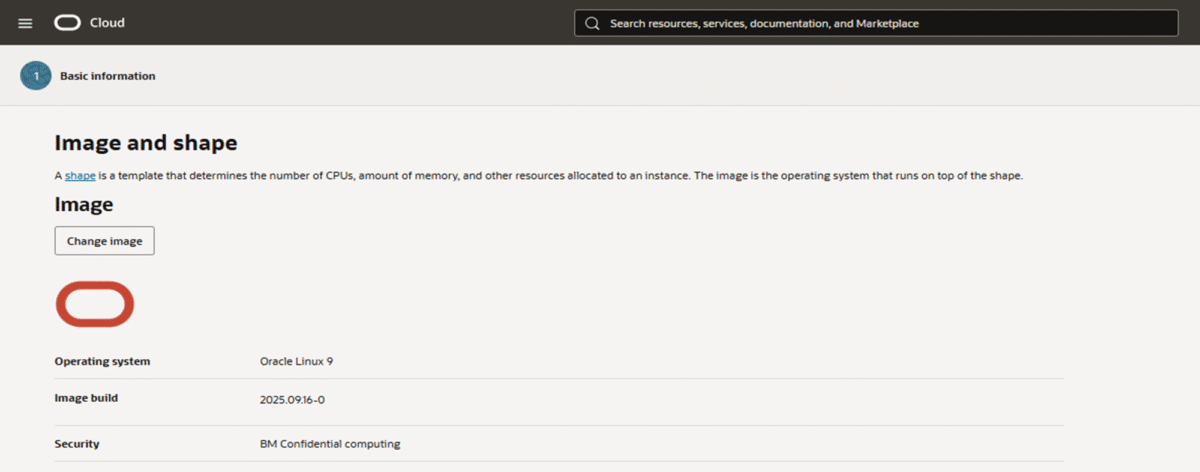
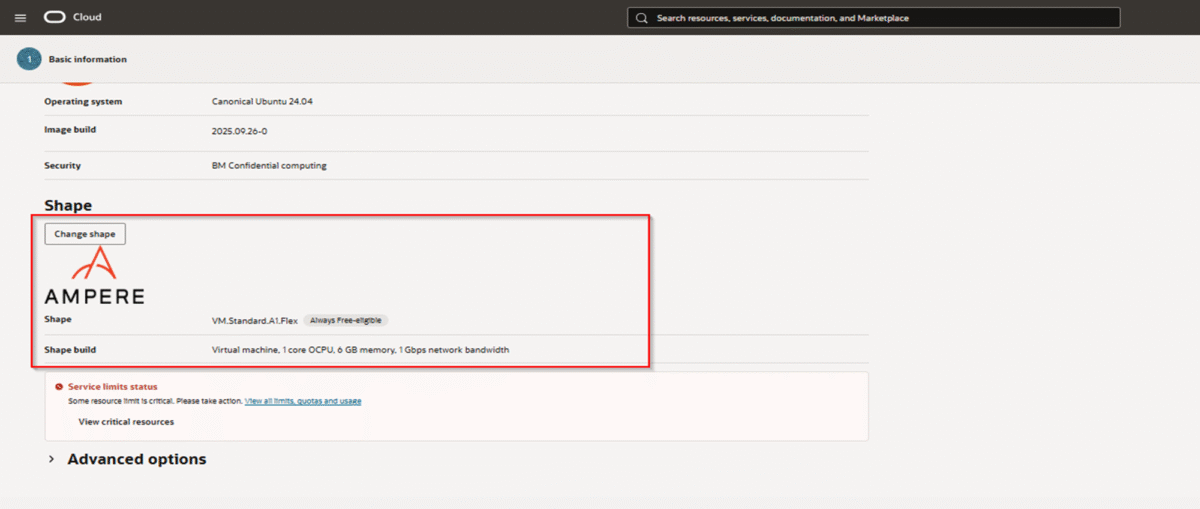
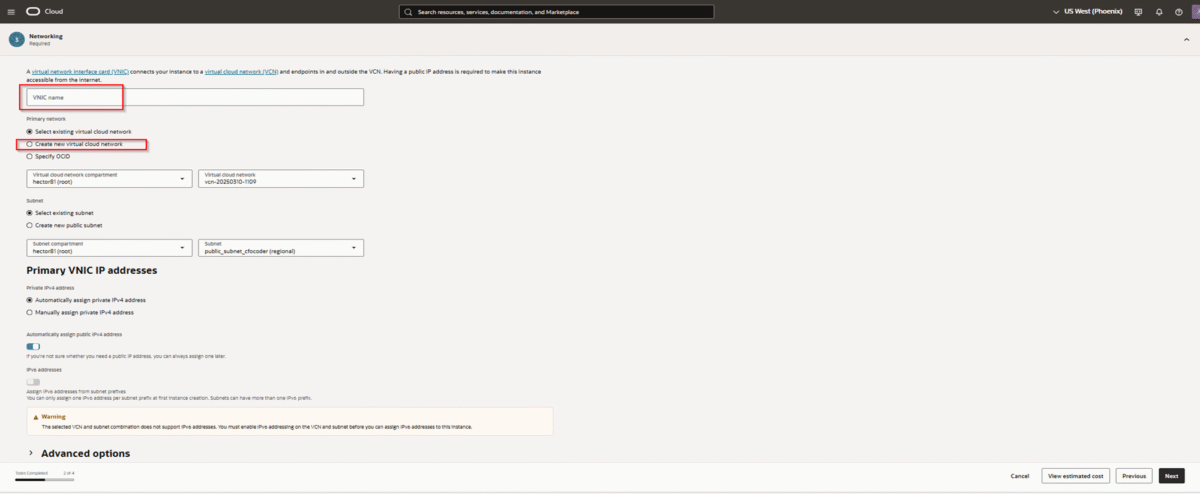
Image and Shape: This is the most important part
Click “Edit”
-
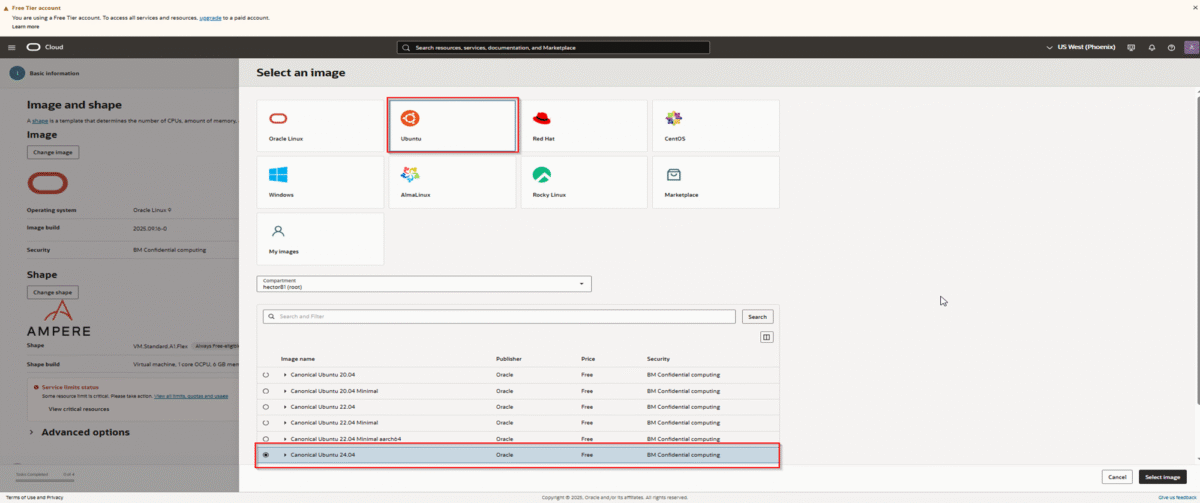
Click “Change Image” and select Ubuntu (the latest LTS version – currently 24.04)
-
Click “Change Shape”
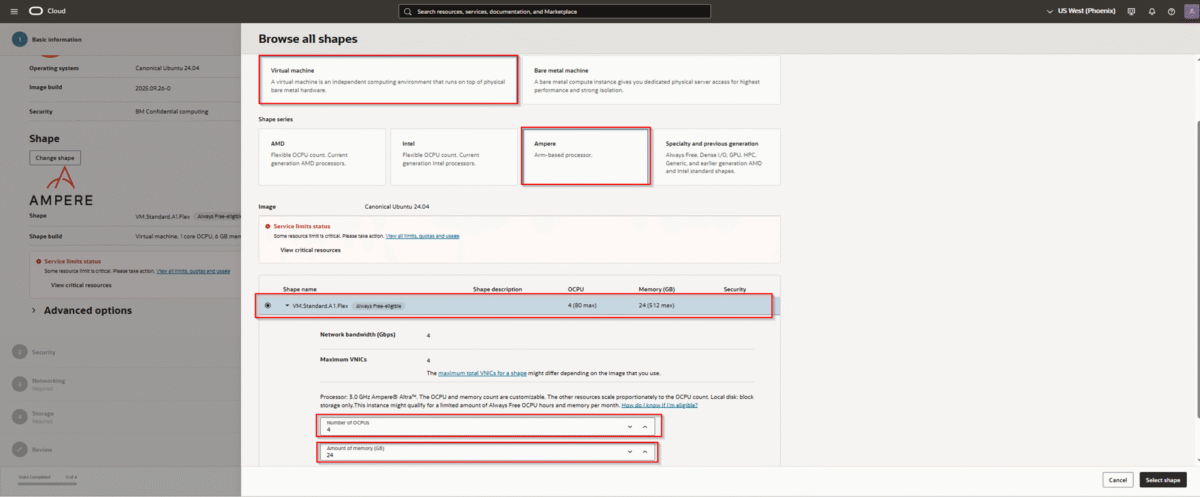
-
Select “Ampere” under “Shape series”
-
Choose the VM.Standard.A1.Flex shape
-
Drag the OCPU slider to 4 and the Memory slider to 24
-
This uses up your entire free ARM allocation for maximum power
-
Click “Select shape”
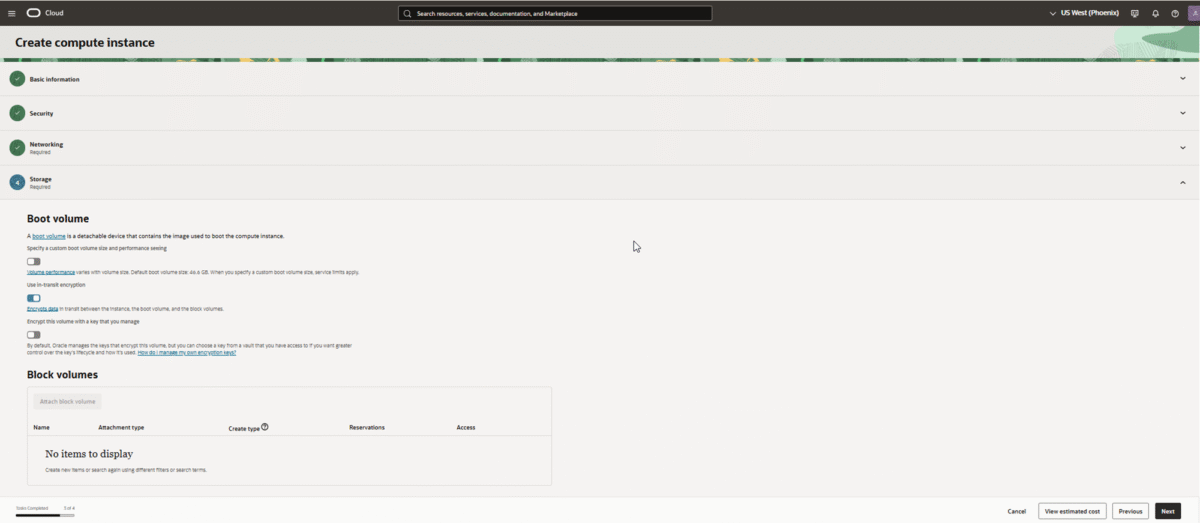
Boot Volume:
-
The default boot volume size is 50 GB (minimum: 47 GB)
-
You can increase it up to 200 GB, but this uses your entire free storage allocation
-
Important: The 200 GB free tier limit applies to the combined total of boot volumes AND block volumes
-
Recommended approach: Keep the default 50 GB boot volume, then add a 150 GB block volume later for flexibility
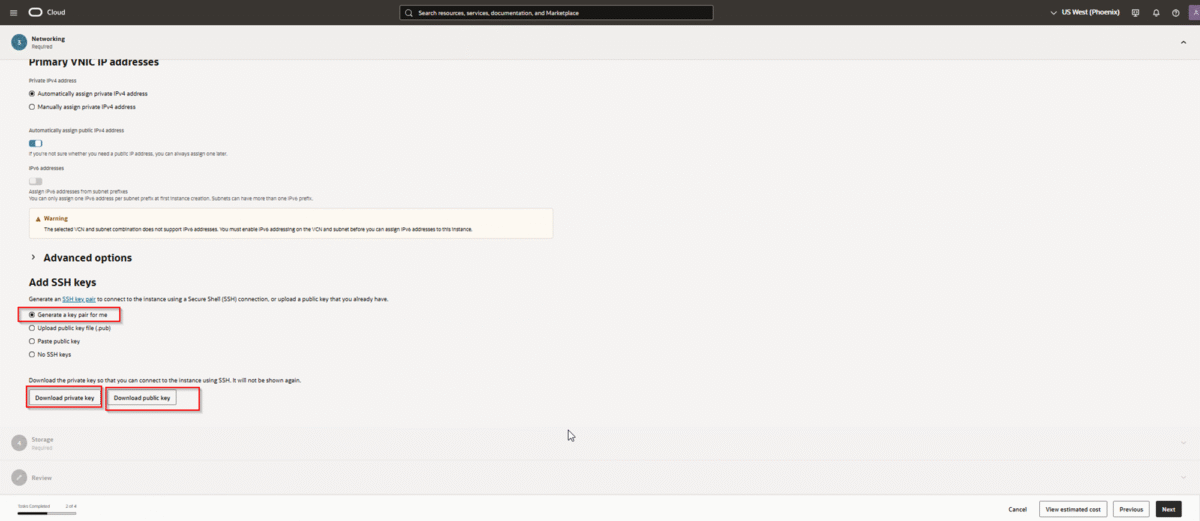
SSH Keys:
-
Download and securely store the private key. Losing it means losing access to the VM
-
The private key file on your local machine must have permissions 600 or 400
-
Use a dedicated key for this server
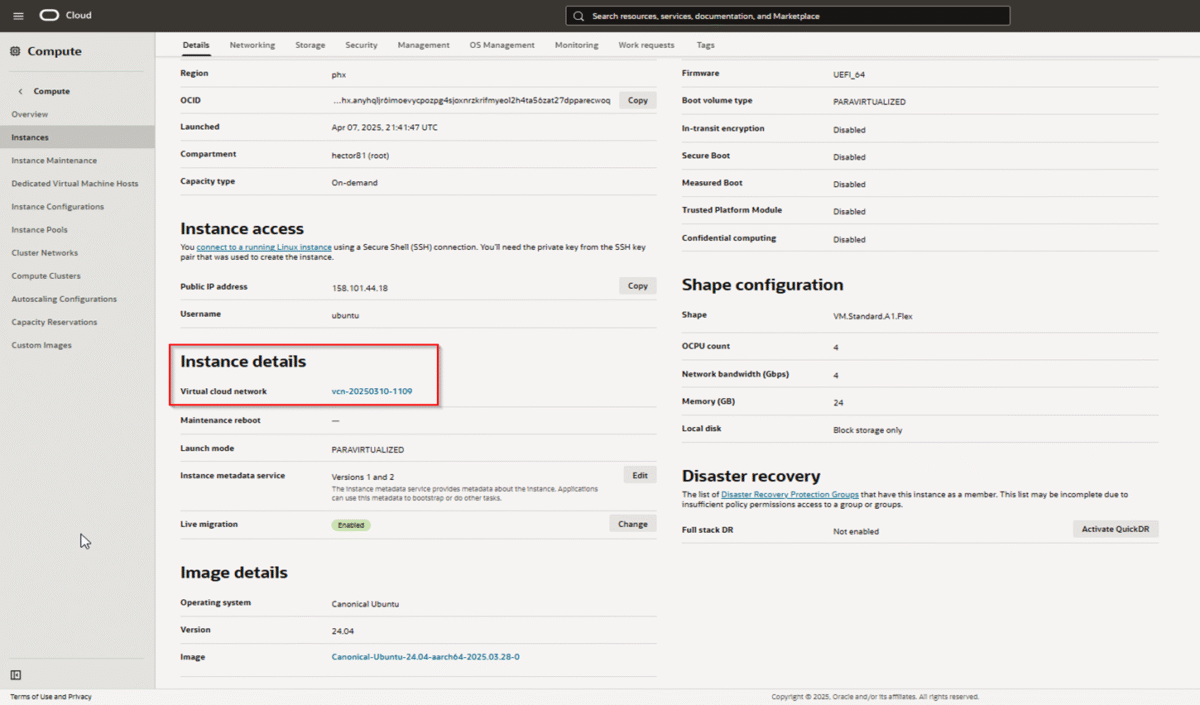
After all these steps, click “Create” to launch the VM. It will take a minute or two to provision. Once it’s “Running” (green), note down its Public IP Address.
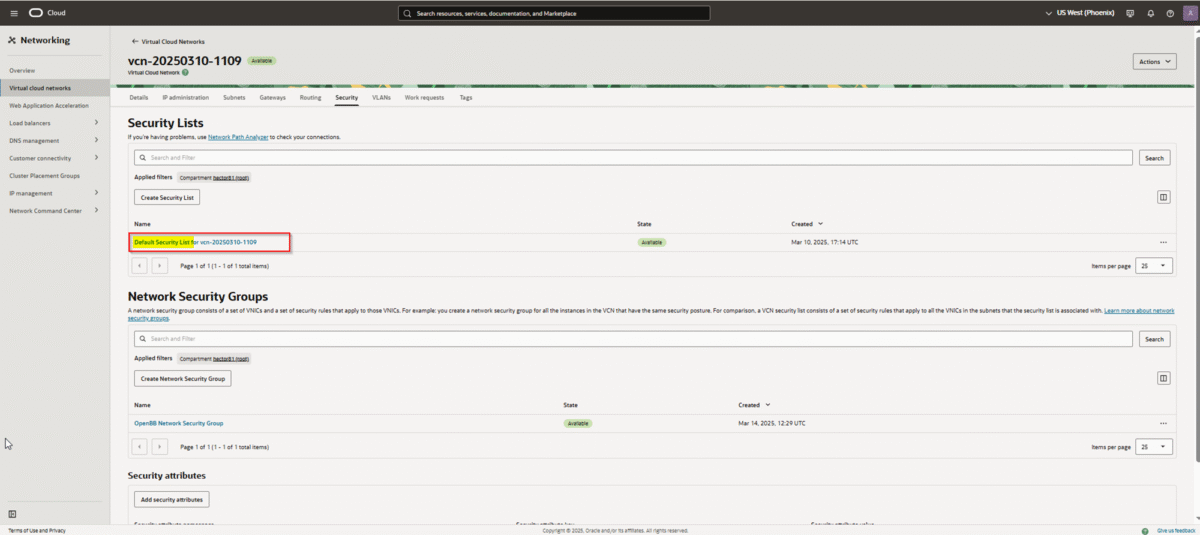
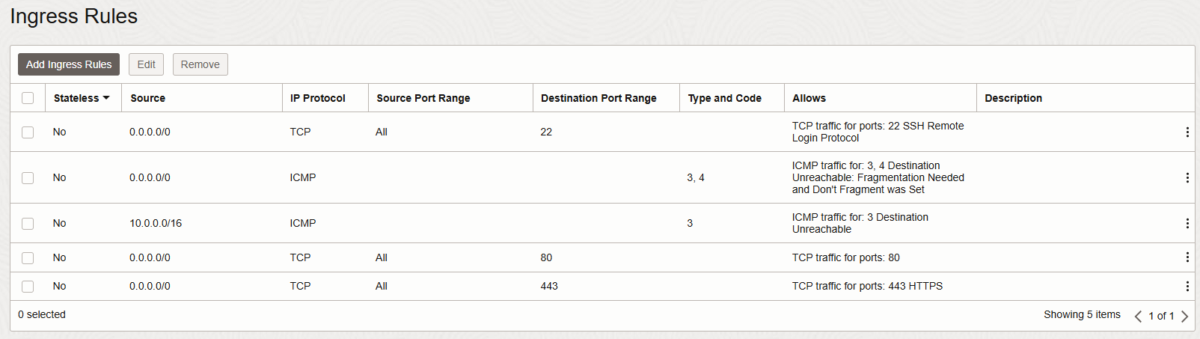
- Security List: This is absolutely critical. Oracle Cloud has a built-in firewall that must be configured
Create a new Security List (or modify the default)
- Add Ingress Rules BEFORE launching the instance:
Rule 1 (SSH):
Source: 0.0.0.0/0
-
IP Protocol: TCP
-
Destination Port Range: 22
-
Stateless: No
-
Rule 2 (HTTP):
Source: 0.0.0.0/0
-
IP Protocol: TCP
-
Destination Port Range: 80
-
Stateless: No
-
Rule 3 (HTTPS):
Source: 0.0.0.0/0
-
IP Protocol: TCP
-
Destination Port Range: 443
-
Stateless: No
Important: Without these rules, the VM will be unreachable, even if UFW is configured correctly later. This is the single biggest source of problems for new users.
When you create a VM, it usually gets an ephemeral public IP that can change if you stop/start the VM. A reserved public IP stays assigned to your account until you release it.
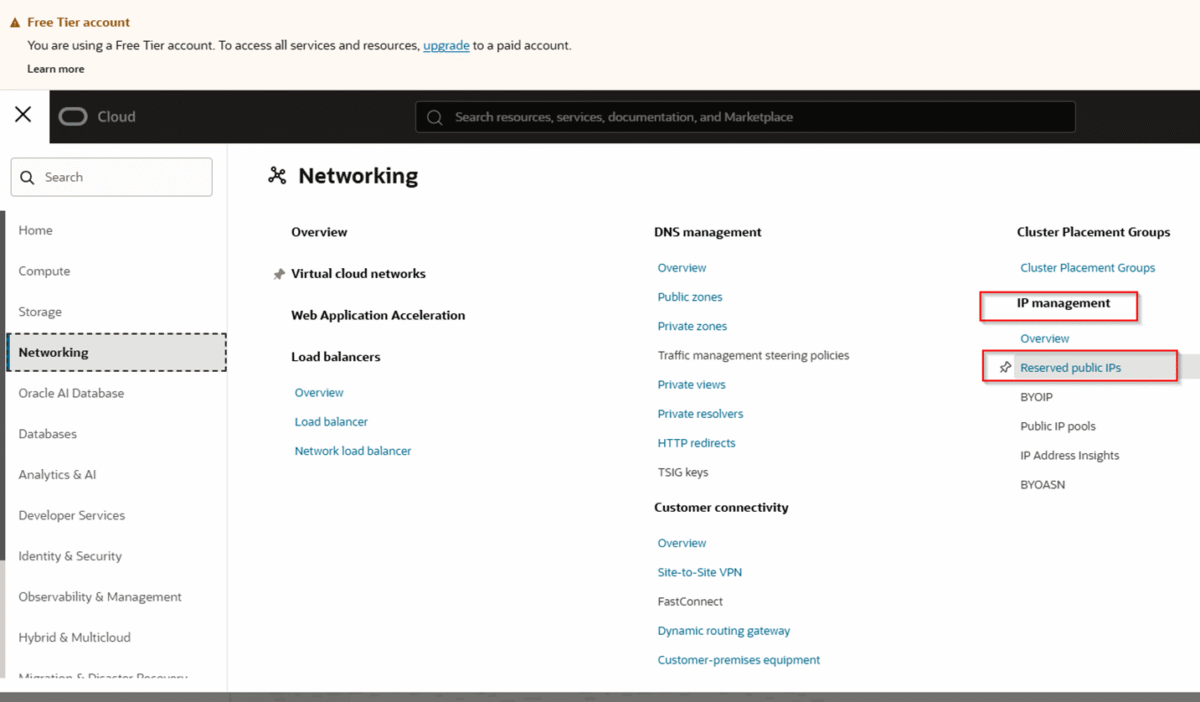
Log in to your Oracle Cloud Infrastructure (OCI) console.
In the OCI menu, go to Networking → IP Management → Reserved Public IPs
-
Click the Reserve Public IP Address button
-
Fill in the details:
Create in Compartment: Select the same compartment where your VM is located
-
Name: Give it a descriptive name (e.g., my-server-reserved-ip)
-
IP Address Source: Choose Oracle (Recommended)
-
IP Address Assignment: Choose Reserve a public IPv4 address
-
Click Reserve Public IP Address
-
Go to your VM instance details: Compute → Instances → Click your VM
-
Under Resources, click Attached VNICs
-
Click on the name of your VNIC
-
Under Resources, click IPv4 Addresses
-
Click the three dots menu (…) next to the ephemeral IP address
-
Select Edit
-
Change Public IP Type to No Public IP
-
Click Update
-
Stay on the same IPv4 Addresses page for your VNIC
-
Click “Assign Public IPv4 Address” (or click the three dots on the Private IP Address and hit “Edit”)
-
Choose Reserved Public IP
-
Select the reserved IP you created from the dropdown
-
Click Assign or Update
You’ll use an SSH client to connect. If you’re on Windows, you can use PowerShell, WSL, Git Bash or PuTTY. On macOS or Linux, use your terminal.
If you’re using WSL on Windows, first copy the key to your WSL instance:
# Copy from Windows downloads to WSLcp /mnt/c/Users/your_username/Downloads/ssh-key-file.key ~/.ssh/my-server.key
# Set the correct permissions (mandatory for security)chmod 400 ~/.ssh/my-server.key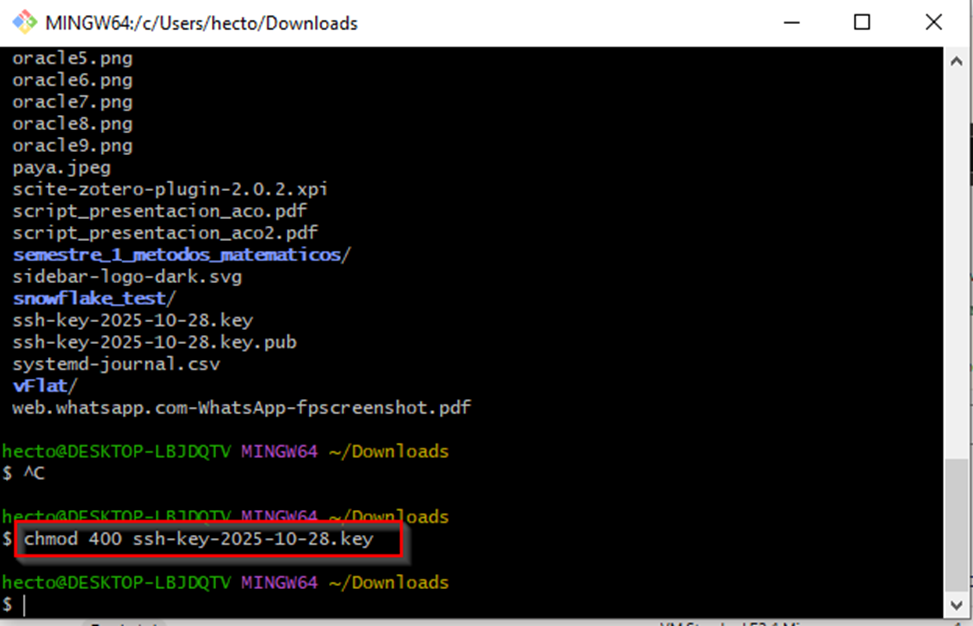
If you’re on macOS or Linux, just move the key to ~/.ssh/ and set permissions:
# Move the key to SSH directorymv ~/Downloads/ssh-key-file.key ~/.ssh/my-server.key
# Set the correct permissionschmod 400 ~/.ssh/my-server.key# Replace the IP with your server's public IPssh -i ~/.ssh/my-server.key ubuntu@YOUR_SERVER_IPType yes when prompted to trust the host. You are now logged into your new server!
Note: The default username for Ubuntu instances is ubuntu
When Oracle creates your Ubuntu VM, it automatically sets up these user accounts:
-
root: The superuser account with full system privileges (SSH login disabled for security)
-
ubuntu: The default user account you use to connect via SSH
Important Security Note:
-
Neither root nor ubuntu have passwords set by default
-
Oracle Cloud uses SSH key-based authentication only – password login is disabled
-
The ubuntu user has passwordless sudo access (can run admin commands without a password)
-
You authenticate using the SSH private key you downloaded during VM creation
While you can use the ubuntu account for everything, creating your own user account is recommended for:
-
Emergency Console Access: If you get locked out of SSH, you can use the Oracle Instance Console to login with a password-based account
-
Best Practice: Separate your personal administration from the default system account
-
Multiple Administrators: Give access to other people without sharing your SSH key
-
Better Audit Trail: Track who performed which actions on the server
# Create a new user (replace 'username' with your desired username)sudo adduser username
# This will prompt you to:# 1. Set a password (important for Oracle Console access!)# 2. Enter optional user information (you can skip these)
# Add the user to the sudo group (for administrative privileges)sudo usermod -aG sudo username
# Add the user to the adm group (for log access)sudo usermod -aG adm usernameIf you want to login directly as your new user via SSH:
# Switch to the new usersu - username
# Create SSH directorymkdir -p ~/.sshchmod 700 ~/.ssh
# Copy the authorized keys from ubuntu usersudo cp /home/ubuntu/.ssh/authorized_keys ~/.ssh/sudo chown username:username ~/.ssh/authorized_keyschmod 600 ~/.ssh/authorized_keys
Now you can connect directly:
ssh -i ~/.ssh/my-server.key username@YOUR_SERVER_IPYou can switch between users without logging out:
# Switch to your user accountsu - username
# Switch back to ubuntu (if needed)su - ubuntu
# Return to previous userexitBefore installing anything, let’s update the system and prepare for security configuration.
# Update package list and upgrade installed packagessudo apt update && sudo apt upgrade -yThis ensures all your system packages are up to date with the latest security patches.
UFW (Uncomplicated Firewall) is a simple firewall to manage access rules by ports. This provides an additional layer of security on top of Oracle’s cloud firewall.
CRITICAL WARNING: Before enabling UFW, you MUST allow SSH connections, or you will lock yourself out of the server!
To prevent accidental lockout, connect to your VM from the Oracle Instance Console:
It will ask for the username and password that we created in the step earlier. We can’t use root or ubuntu users because they are passwordless. Accessing the server from Cloud Shell should be done only for emergencies when for some reason we get locked out from accessing it via SSH, that’s why it is very important to setup another user
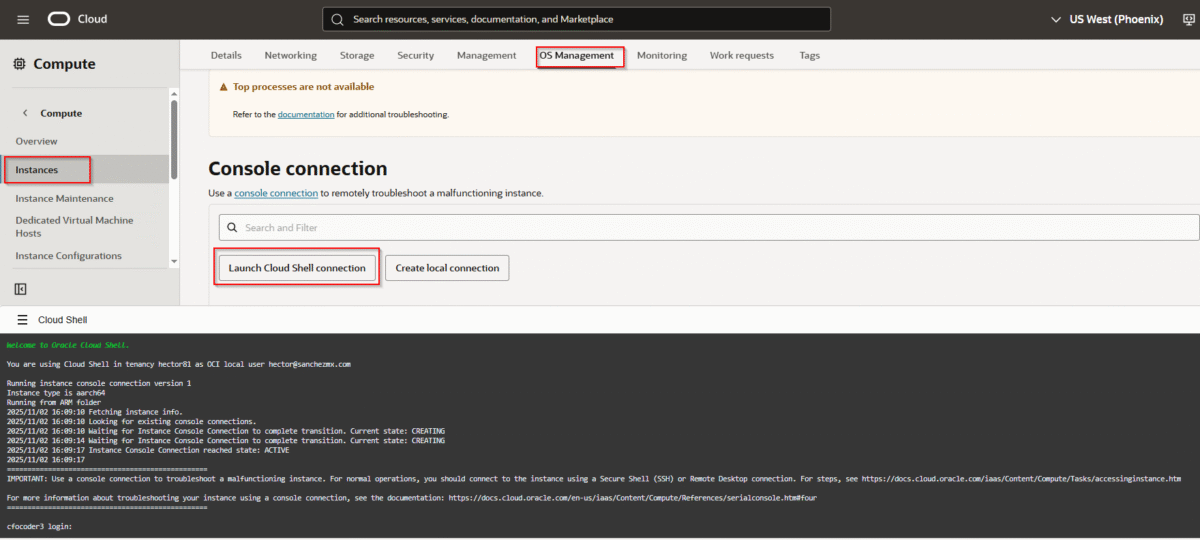
-
Go to your instance details in OCI Console
-
Click “Launch Cloud Shell Connection”
-
This opens a terminal at the bottom
-
Switch to the ubuntu user:
sudo su - ubuntuVerify you’re using the correct user:
whoami# Update and install UFWsudo apt updatesudo apt upgrade -ysudo apt install ufw -y
# CRITICAL: Allow SSH first to prevent lockoutsudo ufw allow 22/tcp
# Allow HTTP and HTTPS for web trafficsudo ufw allow 80/tcpsudo ufw allow 443/tcp
# Check the rules before enablingsudo ufw show addedAfter verifying the rules look correct:
# Enable the firewallsudo ufw enable
# Verify the statussudo ufw status
You should see output showing UFW is active with ports 22, 80, and 443 allowed.

If you can’t connect via SSH after enabling UFW, connect via Oracle Instance Console and run:
sudo ufw disableThen carefully review and re-add your firewall rules.
If you need to allow other ports for specific applications:
# MySQL/MariaDBsudo ufw allow 3306/tcp
# PostgreSQLsudo ufw allow 5432/tcp
# Custom application portsudo ufw allow 8080/tcp
Best Practice: Only allow ports that are absolutely necessary. The fewer ports you have open, the more secure your server is.
This is where we replace NGINX and Certbot with a much simpler solution. Caddy automatically provisions and renews free SSL certificates from Let’s Encrypt.
We’ll add Caddy’s official repository to ensure we get updates:
# Install prerequisitessudo apt install -y debian-keyring debian-archive-keyring apt-transport-https
# Add Caddy's GPG keycurl -1sLf 'https://dl.cloudsmith.io/public/caddy/stable/gpg.key' | sudo gpg --dearmor -o /usr/share/keyrings/caddy-stable-archive-keyring.gpg
# Add Caddy's repositorycurl -1sLf 'https://dl.cloudsmith.io/public/caddy/stable/debian.deb.txt' | sudo tee /etc/apt/sources.list.d/caddy-stable.list
# Update and install Caddysudo apt updatesudo apt install caddy
# Verify Caddy is runningsudo systemctl status caddyCaddy is configured with a simple file called Caddyfile. Let’s create a basic configuration.
# Open the Caddyfile with a text editorsudo nano /etc/caddy/CaddyfileDelete all the default content and replace it with this:
your-domain.com { respond "Hello from my new Oracle server!"}Important: Replace your-domain.com with the actual domain name you will point to this server.
Save the file and exit (Ctrl+X, then Y, then Enter).
To apply the new configuration:
sudo systemctl reload caddyCheck the status:
sudo systemctl status caddyYou should see that Caddy is “active (running)”.
Now, point your domain name to the server’s IP address.
-
Go to your domain registrar (Namecheap, GoDaddy, Cloudflare, etc.)
-
Find the DNS management section for your domain
-
Create an “A” record:
Host/Name: @ (for the root domain your-domain.com) or www (for www.your-domain.com)
-
Value/Points to: Your server’s Public IP Address
-
TTL (Time to Live): Set to the lowest possible value or leave as default
-
Save the record
DNS changes can take anywhere from a few minutes to a few hours to propagate. You can check propagation at whatsmydns.net.
Once your DNS has updated, open a web browser and navigate to https://your-domain.com.
You should see:
-
Your message: “Hello from my new Oracle server!”
-
A padlock icon in the address bar (indicating HTTPS is working)
-
Caddy has automatically handled the entire HTTPS process for you!
If you don’t see your site:
-
Check DNS Propagation: Use whatsmydns.net to verify DNS has propagated
-
Check Firewalls: Verify ports 80 and 443 are open in both UFW and Oracle Cloud security list
-
Check Caddy Configuration:# View Caddy logs sudo journalctl -u caddy -n 50 # Test from within the VM curl http://localhost/
-
Verify Domain in Caddyfile: Make sure the domain in /etc/caddy/Caddyfile matches exactly
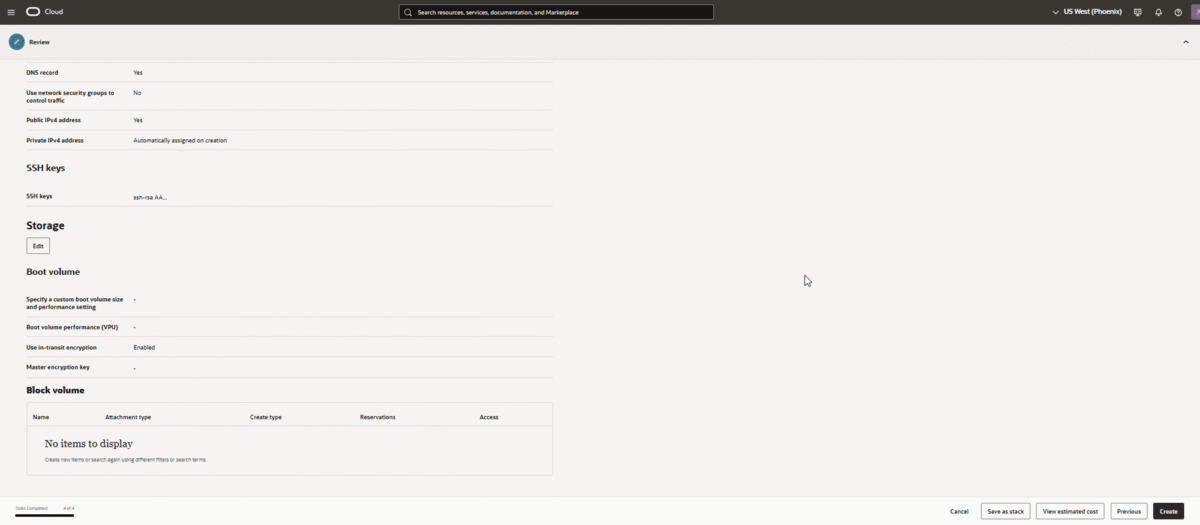
Since we used the default 50 GB boot volume during instance creation, you have 150 GB of free storage remaining in your Always Free allocation.
Oracle’s Always Free tier provides 200 GB total of block storage, which includes:
-
Boot volumes: The primary disk where your OS is installed (minimum 47 GB, default 50 GB)
-
Block volumes: Additional storage you can attach to instances
You have two options:
-
Single large boot volume: 200 GB boot volume (uses entire allocation, less flexible)
-
Boot + Block volumes: 50 GB boot + 150 GB block volume (recommended for flexibility)
-
Flexibility: You can detach and attach block volumes to different instances
-
Data persistence: Keep your data separate from the OS
-
Better organization: Use boot volume for OS/apps, block volume for data
-
Easier backups: Back up data volume separately from system volume
For detailed instructions on creating, attaching, and properly mounting a block volume with systemd (for automatic mounting on boot), see this dedicated guide:
Adding and Mounting a Block Volume in Ubuntu with systemd
The guide covers:
-
Creating and attaching a block volume in Oracle Cloud
-
Formatting the volume with ext4
-
Setting up systemd mount units (more reliable than fstab)
-
Proper permissions and ownership configuration
-
Troubleshooting common issues
Before installing additional software, create a backup image of your VM. This allows you to quickly restore or create new VMs if something goes wrong.
It’s strongly recommended to stop the VM before creating a custom image to ensure filesystem consistency:
-
In OCI Console, go to your instance details
-
Click “Stop” and wait for it to completely stop
-
On the instance details page, click “More Actions” → “Create Custom Image”
-
Give it a descriptive name (e.g., my-server-caddy-baseline-2025-11-01)
-
Choose your compartment
-
Click “Create Custom Image”
The process will take some time depending on your boot volume size.
After the image is created, start your VM:
-
Click “Start” on the instance details page
-
Wait for it to reach “Running” state
-
Reconnect via SSH
To create a new VM from your custom image:
-
Go to Compute → Custom Images
-
Find your image and click it
-
Click “Create Instance”
-
Complete the instance creation as normal
tmux allows you to manage multiple terminal sessions and keep processes running even after you disconnect:
# Install tmuxsudo apt updatesudo apt install tmux -yBasic tmux commands:
| Action | Command |
|---|---|
| Start a new session | tmux |
| Create a named session | tmux new -s session_name |
| Detach from session | Ctrl + B then D |
| List active sessions | tmux ls |
| Reattach to session | tmux attach -t session_name |
| Close session from within | exit |
Essential tools for downloading files and making HTTP requests:
sudo apt updatesudo apt install curl wget -yIf you plan to run Python applications:
# Install pip3sudo apt install python3-pip -y
# Install pipx (for isolated Python tools)sudo apt install pipxpipx ensurepath
# Install uv (modern Python package manager)pipx install uv
# Verify installation (close and reopen terminal first)uv --versionYou now have a powerful, secure, and free ARM server. Here are some great ideas for what to do with it:
Caddy can easily:
-
Run a static site using the file_server directive
-
Act as a reverse proxy for applications written in Node.js, Python, Go, or PHP
Example Caddyfile for a static site:
your-domain.com { root * /var/www/your-site file_server}Example Caddyfile for a reverse proxy:
app.your-domain.com { reverse_proxy localhost:3000}Install Docker and manage multiple applications in containers:
sudo apt install docker.io docker-compose -ysudo usermod -aG docker $USERImportant: Use Docker images built for the linux/arm64 architecture. Many official images on Docker Hub are multi-arch and will work seamlessly.
The standard Java version of the Minecraft server runs perfectly on ARM:
sudo apt install default-jre -yThen download and run the Minecraft server JAR file.
Set up Plex or Jellyfin. Both have official, native builds for ARM64:
-
Jellyfin ARM64 Installation
-
Plex Media Server
Install your application stack on the server and use the free Oracle database as your backend for amazing performance, freeing up your server’s resources.
Set up:
-
Git server (Gitea or GitLab)
-
CI/CD pipelines
-
Code-server (VS Code in the browser)
-
JupyterHub for data science work
Important: Oracle may reclaim “idle” Always Free instances. An instance is idle if it has very low CPU, memory, or network usage for 7 days.
To prevent this:
-
Run a web server that gets occasional traffic (which you’ve done!)
-
Set up a simple cron job that performs periodic tasks
-
Run a lightweight monitoring service
-
Keep Docker containers running
Simply having Caddy running and serving your website should be sufficient to avoid the idle classification.
-
Always use SSH keys, never password authentication
-
Configure both firewalls: Oracle Cloud Security List AND UFW
-
Create regular backups using Custom Images
-
Keep the system updated: Run sudo apt update && sudo apt upgrade regularly
-
Use tmux for long-running processes
-
Monitor logs: sudo journalctl -u caddy for Caddy logs
-
Use subdomain for applications: Keep your main domain for your main site
-
Test in staging first: Use your custom image to spin up test VMs for experimentation
-
Document your setup: Keep notes of what you’ve installed and configured
-
Set up monitoring: Consider installing monitoring tools like Netdata or Prometheus
your-domain.com {    root * /var/www/main-site    file_server}
blog.your-domain.com {    root * /var/www/blog    file_server}
api.your-domain.com { reverse_proxy localhost:8080}your-domain.com { encode gzip
header { # Enable HSTS Strict-Transport-Security "max-age=31536000; includeSubDomains; preload" # Security headers X-Content-Type-Options "nosniff" X-Frame-Options "DENY" Referrer-Policy "strict-origin-when-cross-origin" }
root * /var/www/your-site file_server}your-domain.com { rate_limit { zone dynamic { key {remote_host} events 100 window 1m } }
reverse_proxy localhost:3000}You now have a production-ready, secure, and powerful free server running on Oracle Cloud with Caddy handling automatic HTTPS. This setup combines:
-
Security: UFW firewall + Oracle Cloud Security Lists + automatic HTTPS
-
Simplicity: Caddy’s easy configuration
-
Power: 4 ARM cores and 24GB RAM
-
Reliability: Custom image backups
-
Scalability: Ready for multiple applications and domains
Enjoy your free forever server! 🚀
Additional Resources:
-
Oracle Cloud Free Tier Documentation
-
Caddy Documentation
-
Ubuntu Server Guide
-
UFW Documentation